Tuesday, August 17, 2021

How to use origami to achieve any property (Part 1)

           Origami is a pretty powerful tool, if you know how to apply it to a given situation. Here is an algorithm you can use to creatively solve nearly any geometric problem, given some amount of creativity.

The first step is to reduce your situation to lines. For example, I recently observed someone struggling to cut circles out of parchment paper for lining cake tins. This can easily be solved with origami, once you’ve reduced your problem to lines. In this case, what you have to do is approximate the circle as a many-sided polygon.

The next step is to notice any symmetries present in the system. In the circle paper cutting example, we can see that there are many lines of symmetry along the diameters - wherever you see a line of symmetry, you’ll most likely make a fold. 

The second line of the diagram shows the process. When you start, you fold along the dashed lines to form a right triangle. You’d probably want to fold the triangle a few more times than I’ve shown here until it’s a really pointy right triangle unless you’re OK with octagons. You cut along the dotted lines and the unfold into your finished (rather low polygon count) circle!

In this example, the algorithm ends here, but for some problems you might need a few more steps. In particular, in situations where different parts are moving, consider the type of motion in question. Are you dealing with a rotational hinging motion, a linear motion, or a combination (like a screw). In hinging motions, you want one or a set of mountain folds to dominate your structure. In linear motions, you want parallel and alternating sets of mountain and valley folds, sort of like an accordion. In the screw motion, you do the same but with the folds at angles.

At this point, you might be thinking, “Hang on a moment, this is total BS! You’ve just chosen a very simple example that happens to conform to your model; not everything’s going to turn out like that!” I’d say that’s a pretty reasonable response. The thing is, though, this algorithm really does apply to basically everything. In fact, if you apply the parchment paper circle algorithm in reverse, and go a little bit further, you basically get Robert Lang’s famous Treemaker algorithm. Check out langorigami.com/article/treemaker/! If you read the article, you’ll notice that the first step is very similar to what I advocate - making a mathematical tree model is a form of reducing the problem to lines. The Treemaker then unfolds these lines into (again, very low polygon) circles, which it then packs on a page, and then voila - you have your folding pattern.

Actually, there’s another cool mathematical theorem that shows that you can make any shape (or at least any well-behaved shape) by folding a piece of paper, making a single cut, and unfolding. It’s called the, uh, Fold-and-Cut Theorem. You can watch a nice Numberphile video on it here.

This article was getting really long, so I decided to split it up into parts. Stay tuned for part 2!


Friday, August 13, 2021

Origami Letters

 https://www.letterstrellis.com/activities/origami-letters 

Folding a letter size sheet (8-1/2 x 11 inch) into its own envelope for mailing.  The above page has a video instruction, and a template to follow for the folds.

There is a QR code that can be stuck to the back of the envelope to assist the recipient how to open the letter without damaging it.

Finally, some information on "letterlocking" - a number of methods, including some fancy folding and tucking (and cutting) that were used to assure that a letter had not been tampered with in transit.  Mary Queen of Scots locked her last letter using some of these techniques before she was beheaded. 


Wednesday, March 24, 2021

MIT foldable surgery tool

             As biotechnology improves, we are gaining new surgical capabilities, allowing us to move towards less invasive procedures which have obvious advantages. “However, sealing and repairing tissues is still a major challenge for minimally invasive surgery,” says Sarah Wu, a graduate student at MIT mechanical engineering. This is because sealing and repairing tissues often involves many sensors, haptic feedback, and tools. To combat this Sarah Wu’s team developed a sort of fabric that is engineered to function as a tissue-sealing patch. One side contains sticky microparticles infused with a liquid that prevents contamination with bodily fluids and the other contains a non-sticky layer that limits contamination with bacteria and the like. This creates a nice, foldable sheet which you can do origami with to your heart’s content. The key is to imagine this fabric as a sheet of paper. For instance, one fold pattern allows it to integrate nicely with a laparoscopic stapler to form a sort of surgical tape, or a balloon catheter for sealing things with cylindrical symmetry. Appealingly, this patch is biodegradable even in the body.


Tuesday, March 2, 2021

The Zen of Folding and Forming a Crease

Before

Before you put your first crease in a piece of paper, pick it up, and familiarize yourself with its feel. Is it stiff or flexible?  Is it smooth or rough? Are the edges cut cleanly or does it have a ragged edge? Does the paper bend nicely or does it feel like it is brittle like a dry cracker as if it were going to break as you bend it?  Good folding paper should be thin and lightweight so it does not get too thick with many folds. It should be strong and withstand at least a few folds back and forth along the same line.

During

Feel how the paper handles under your fingers. Crinkle it gently and feel its resistance. Use pads of your fingertips: they are very sensitive and can detect tiny differences in surface and edge features.  In fact, when folding a square in half, if you adjust the paper so the edges touch your fingertips you can tell when the edges are lined up exactly even without looking: your fingertips will tell you.  Then grasp both layers, don't let them slip, and make the crease without letting go.  Same for a diagonal: as you position one corner over the other, let your fingers feel when both sides of the corner are aligned, then grasp the layers together and make the crease.

When forming a crease, start with a wide curve and loosely holding the paper. Gradually (don't rush!) make the curve smaller and tighter, feeling the curve form itself into the crease. When the curve is small and tight, go ahead and press the crease into the paper.

After

Forming the crease in a high quality origami paper can be gentle (using the pads of your fingertips) or firm to very firm (using a fingernail or the slick side of a sharpie pen) to press the crease into a permanent mark. In most standard pieces, a good firm crease can be obtained with a fingernail or hard object making the two layers look and feel like one when you are done.

Look at the finished crease after you are done: are the edges lined up and straight?  Did anything shift between when you knew the edges were lined up and after the crease was completed?  Is the diagonal fold on a square coming to a perfectly symmetrical point (if it's off center one side will show more than the other)? Did a part of the paper get stretched from too much pulling or pushing? Imperfections are just opportunities to practice and make it better, but you have to look carefully at your work to verify that your crease is as good as it can be. Don't just fold and look away.

Practice

Becoming familiar with your paper and how to handle it, how to make it obey your objective,  An exercise that can be done anywhere, is to shape an edge of a piece of paper into an "S".  Start with wide soft curves, but tighten them bit by bit, and as the curves get tighter and smaller, line up an edge with the crease.  Adjust the lengths of each of the 1/3 so they balance out and converge on an exact 1/3 of the edge.  When the curve gets small enough right when the lengths are visually equal, set the crease firmly.  

Creasing Many Layers

When taking a piece and making a crease when there are already many layers in place, it is important to fold all of the layers together, and very important to prevent the inner layers from slipping. One way is to grasp all the layers firmly on both sides of the crease while the fold is being formed. Don't let the inner layers slip away from the crease: this can easily happen if there are many layers already in the piece being folded.

Fold on!

Thursday, February 18, 2021

Auxetic Materials and Face Masks

When ordinary materials are pulled from side to side, the top and bottom tend to shrink towards each other.  It's the behavior of squeezing a balloon: some part comes out somewhere else.

Auxetic materials behave in ways that are surprisingly opposite of ordinary.  https://en.wikipedia.org/wiki/Auxetics  When the sides are pulled away from left to right, the top and bottom actually expand higher and lower.

From a shopping bag I folded a pattern similar to the offset zig zag of the auxetics diagram, but interestingly there was little movement in one direction, while there was great flexibility in expanding in the other.  The expandability looked like it might be useful when used in a face mask to cover different sizes of faces, but sealing the edges is a challenge.

Here is a brief video to observe the behavior of this piece.

Wednesday, February 17, 2021

TED-Ed origami video

    Just a quick thing I wanted to share here, I recently came across this beautifully animated video by TED-Ed about the mathematical rules behind origami, specifically, two-dimensional folds. It's great, I hope you enjoy it!


Wednesday, January 27, 2021

Origami landing legs

    Say you are designing a reusable rocket (don't worry, it's just a thought experiment). A rather important part of a reusable rocket is the landing legs. However, random sticks won't do, you must also include shock absorbers. Enter, origami!

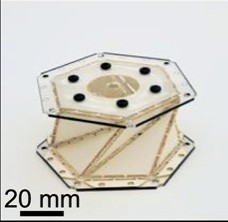
    A few years ago (sorry I'm a bit late on this), researchers investigated the use of an origami structure to build a shock absorber. Their design includes multiple compressible hexagonal prisms. When one end of the chain is compressed, it causes a compression wave to travel up the structure. Subsequently, the prism then expands, which causes a rarefaction wave to also travel up the structure. However, the rarefaction wave travels faster than the compression wave, causing the two to meet, and cancel each other out. Why does this occur? I have literally no idea. I've been ruminating on this post for several months and still haven't found out.

    Anyways, here's a photo of what the unit's fold pattern was: 


Here's one of a folded unit:

Here is a picture of the full mechanism:
I should note that on some of the other media regarding this article the setup involved adjacent prisms being mirror images of each other.


I got all my images from it.


creases

 Crease [noun]: the indentation caused by a fold


In our various discussions of various delightful pieces of origami, we here at Ourigami Origami Informational Content Recipes Inc. LLC Eastern Massachusetts division often tell you to do things like “fold so that the creases lie on top of each other” and “fold from the edge to the crease”. But what do we really mean? Well, as you might have heard, a crease is the line that’s the result of a fold. So, if you “fold so that the creases lie on top of each other” you are creating a new fold halfway between the two previous folds, and “folding from the edge to the crease” is creating a fold halfway between the previous fold and edge. However, this usually comes with a couple assumptions - specifically, that the fold is perfectly sharp and linear - and an important distinction when folding.

Depending on the force you apply when folding, the crease will turn out very differently. If you apply a large amount of force, your crease will be essentially flat. However, if you don’t, it’ll be a glorified bend in the paper, with the radius of the bend depending on exactly how much force you put. Sometimes, this is desirable, as when you want to bend over another, sharper fold.

Another important distinction is mountain vs. valley folds. These terms are really relative, they merely depend on the way you hold the paper. A “valley fold” means the fold is pointing away from you and a “mountain fold” means the fold is pointing towards you. When there are two of the same type being creased to each other, you usually have slightly less precision than when there are two of different types creased to each other as then you can fit one crease into the other.


Friday, January 22, 2021

The Importance of Equal Dividing

The Importance of Equal Dividing

Dividing things (line segments, circles, squares or rectangles) into equal parts is of course a geometric and math challenge, but more important than the academic / intellectual "hey I can solve this puzzle!" accomplishment, is the idea of fairness.

Fairness, as in equal parts, is key to the "right" way of doing things.  Even very young children and some monkeys, recognize unfairness before they have words for it, that's how deeply ingrained the idea has been: fairness is in our DNA.

My early experience with fair division was splitting one dessert between my brother and I. The governing principle is this: "whoever makes the cut, the other one has first pick". So it was always an objective to make the cut as even as possible to equal parts. When the number of parts increases, so does the complexity of the solution. How, for example, would you have a piece of cake divided for three cake eaters, in a fair and equitable way? 

Higher numbers only create much more complexity.  For example, if there are 3 people who have to share dessert, who makes the cut(s) and who chooses? At home, you might just appeal to a higher authority: Mom divides the portions and gives them out randomly (maybe each portion is covered, and the 3 dessert eaters pick their piece without seeing the contents. No complaining afterwards, just eat your dessert.

Dividing a pie or cake into equal portions for seven friends can use math and origami methods: https://ourigami.blogspot.com/2020/12/fujimoto-approximation-of-dividing-line.html where the aim is to be as "fair" as possible.

This is one area where use of origami can help in the field of ethics and right behavior.

Origami Masks 2021

Masks, masks, masks. 

(in a) 2008 TED talk by renowned origami artist and physicist Robert Lang. "As weird and surprising as it may sound,” Lang said, “origami may someday even save a life."
https://api.nationalgeographic.com/distribution/public/amp/science/2021/01/we-need-better-face-masks-and-origami-might-help